By Andrew Lum
Since 2001, FreeConferenceCall.com has been providing a reliable and free collaboration solution. Our goal has always been for everyone to be able to setup and host a conference call — from anywhere, at anytime.
Over the years, new features have been added. What began as a free audio conferencing service now includes additional functionality, such as video conferencing and audio-visual recording. While the service is still easy to use, there’s more of a learning curve these days. And that’s why I’m here: to give an overview of conferencing fundamentals.
I worked on the FreeConferenceCall.com front lines for a year as a Customer Care representative while I earned a bachelor’s degree from Long Beach State University. Now, as part of the marketing department, I’ll be blogging regularly to bring you helpful tips on using our service as well as an inside look at the company behind the conferencing!
How to Setup and Host a Conference Call
Let’s get started on our first topic in this series. I’ve broken the process down into understandable steps. Time to kickstart your conferencing experience.
Step One. Sign Up
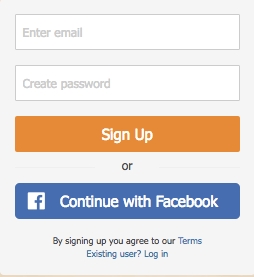
Set up is easy! When you sign up, you will be instantly provided with your account credentials. There is no need schedule a conference call time with us because your conference line will be available to you 24/7. All you need to provide is an e-mail and create a password. Be sure to remember this information because you will need it to access your account in the future.
Step Two. Send Invites
There are lots of ways to invite participants to a conference. The easiest way to do it just depends on how you like to use FreeConferenceCall.com.
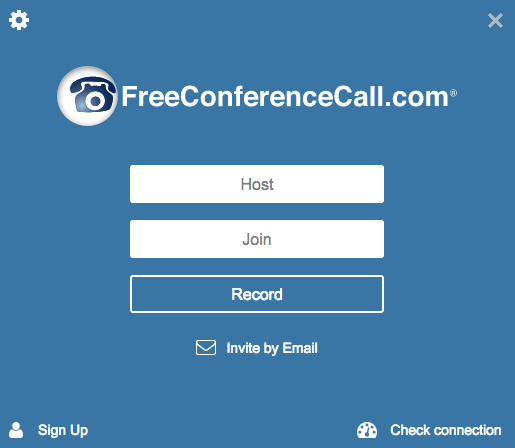
From the desktop app: Launch the Meeting Dashboard and click Invite by Email on the opening popup. Then choose to Invite by Email or Copy to Clipboard. Download the desktop app here.
From the mobile app: Launch your mobile app then click on the menu icon at the top lefthand corner. A menu will popup with Invite Participants appearing at the very top of the screen. Select the method which you would like to use and input the contact information of your participants. Download the mobile app here.
From our website: Click the Invite tab, fill out the information fields on the web page including subject, date and time. Then click Send invite.
From your calendar: Send invites through the scheduling component on Google Calendar™ or Outlook®. Download and install the Google Calendar Plug-in or Outlook Plug-in.
From your online account: Log in to your online account and click Invite. Complete the required fields and Send. My Tip: If you are just having a phone meeting, all you need to do is provide your users with your dial-in number and access code and have them call into the line.
Step Three. Join the Conference
Call into the dial in number and enter your access code. Once you have entered the conference call, you will be prompted for your access code and host PIN. When you have entered that information you will be immediately placed into the call.
If you are a participant and you get in early, just wait until the host joins the line.
By the way — only the first participant hears the hold music, which plays only until another participant joins the call.
The conference call will end automatically when all the participants have disconnected.
To sum it up, sign up with an email and password, invite your participants the way that is most convenient to you, and finally call into the number. Conferencing is easy as 1-2-3! I hope that you’re now comfortable enough to setup and host a conference call on your own.
I know making use of all the features included in your free account may seem a bit overwhelming at first, but stay tuned. The second installment in this series will tackle how to video conference.